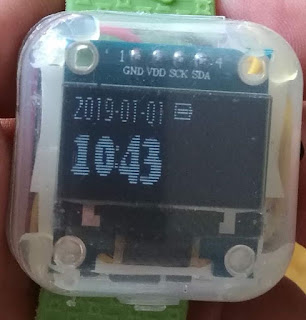
That was an inspiration to make my own wrist watch using the same IC. Here is it:
The watch consists of four elements:
1. AtTiny85 MCU
2. OLED display with SSD1306 controller, 128 x 64 pixels
3. Two buttons, and
4. CR 2025 3V lithium battery.
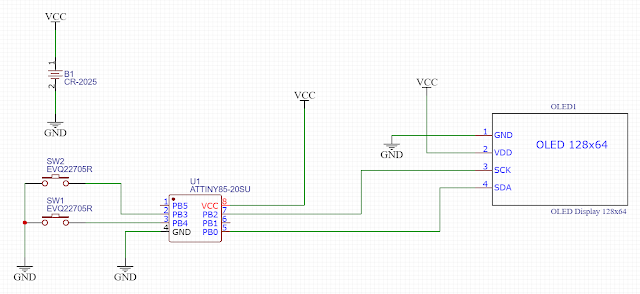
Here is the schematics:
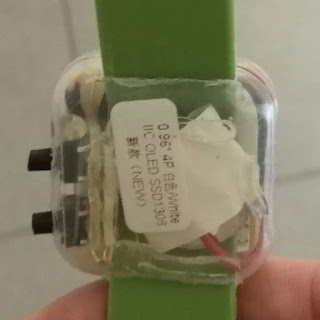
I have used the original plastic box for the OLED display to put all the components inside. Here is the bottom view of the same watch:
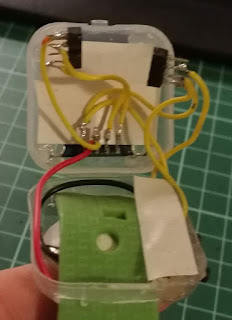
At the bottom, there is a battery, then the wrist belt, and then comes the MCU and the display at the top:
As you can see from the image above, I haven't soldered the MCU to the wires; instead I have soldered a socket (two halves, actually), so I could remove the MCU from the watch in order to program it.
Programming AtTiny85
Regarding programming, here is the link to the github repo (my own rework of the original code):https://github.com/milanvidakovic/AtTiny85Watch
When speaking of programming AtTiny85, I have followed instructions from the https://www.instructables.com/id/ATtiny85-Ring-Watch/ site to install the support for the AtTiny85 into the Arduino IDE.
I have also decided to use my Arduino as a programmer for the AtTiny85. It is not necessary to use the Arduino, but I decided to do so, because it looked like the easier solution.
Here are the instructions:
1. Install the Arduino IDE.
2. Install the ArduinoTiny add-on from the: https://github.com/milanvidakovic/ArduinoTiny
Unzip ArduinoTiny-master.zip
Copy the tiny folder to the hardware folder under Arduino path
3. Add EEPROM support:
In Arduino path, copy hardware\arduino\avr\libraries\EEPROM\EEPROM.h to
hardware\tiny\avr\cores\tiny folder
4. Install TinyWireM Library:
Run Arduino
Select Sketch Menu -> Include Library sub-menu -> Manage Libraries...
Search TinyWireM
Select TinyWireM and click Install button
Close Library Manager and close Arduino
5. Install the Arduino as ISP project on the Arduino board
6. Use the Arduino as ISP to burn Bootloader to the AtTiny85 MCU
7. Use the Arduino as ISP to send the AtTiny85Watch project to the AtTiny85 MCU
Arduino as ISP
If we want to program AtTiny85 using Arduino, then we need to install the Arduino as ISP sketch on the Arduino:1. Open File -> Examples -> ArduinoISP -> ArduinoISP
2. If you use SPI on expansion port, not on the 6-pin connector at the top of the Arduino, then you need to uncomment the following line:
// Uncomment following line to use the old Uno style wiring
// (using pin 11, 12 and 13 instead of the SPI header) Nano, Due...
#define USE_OLD_STYLE_WIRING
3. Click on the Upload button to make your Arduino an AtTiny85 programmer.
Use Arduino as ISP for programming AtTiny85
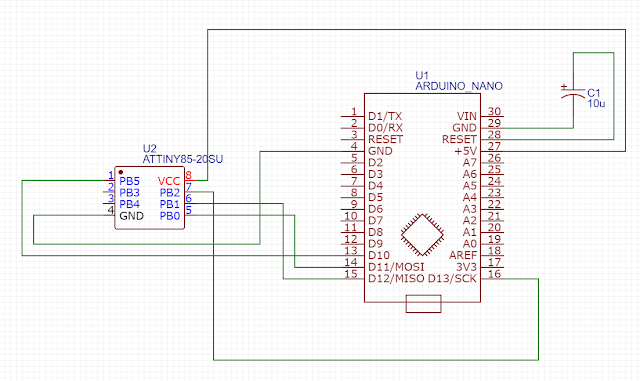
To use the Arduino as a programmer for the AtTiny85, you need to connect AtTiny85 to the Arduino like this:Before uploading any program to the AtTiny85 using Arduino, it is necessary to burn the Bootloader on the AtTiny85:
1. Plug the Arduino to the USB port of your PC
2. Connect the AtTiny85 to the Arduino as shown on the image below
3. Choose Tools -> Board -> AtTiny85 as a Board
4. Choose Tools -> Programmer -> Arduino as ISP
5. Choose Tools -> Clock -> 8 MHz (Internal oscillator...)
6. Choose Tools -> Burn Bootloader
After this, you are ready to Upload your programs on the AtTiny85 using the Arduino as ISP. Just open the sketch, and then click on the Upload button. One note: for the AtTiny85Watch, it is necessary to choose Tools -> Clock -> 1 MHz (Internal oscillator...).
Conclusion
Programming AtTiny85 is perhaps the easiest if you are able to do everything in the Arduino IDE. Also, it
is easier to use the Arduino as a programmer, instead of some proprietary hardware. AtTiny85 is quite
interesting MCU. It is powerful enough to be used for the project like this.
