Welcome to another digital clock build. This time I have made a big digital
clock for my friend. The clock was made using programmable LED strip, cut into small pieces which would act
as segments in a big 7-segment digit.
The code is on github.
The code is on github.
Programmable LED strip
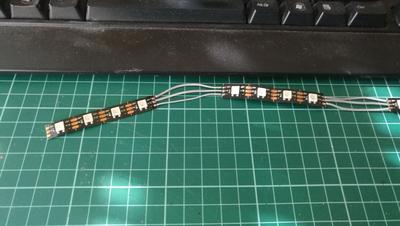
This is a very nice thing - you can set any color to the individual LED bulb on the strip:On the picture above you can see two segments, each having four LEDs. Each LED
is programmable and can be set to any color of the 16 million colors available. I have purchased two meters
of W2812B LED strip and cut it in segments having four LEDs. Then I have connected all segments with three
wires and created digits:
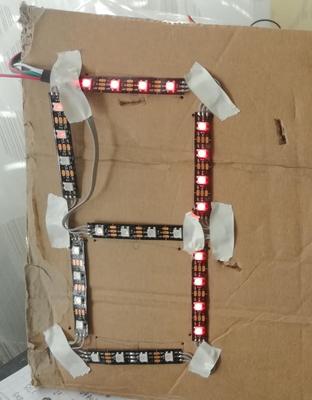
Here you can see seven segments placed temporarily on the cardboard, for the
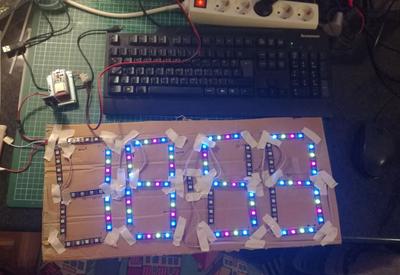
testing purposes. Then I have connected the remaining three digits and two dots between hours and minutes:
I have recycled my previous code for the LED clock so I could now set and turn
on/off individual digits of my new display. Here is the main loop:
void loop() {
setDots(counter % 2);
setDigit(0, hour_1);
setDigit(1, hour_2);
setDigit(2, minute_1);
setDigit(3, minute_2);
delay(1000);
counter++;
if (counter == 2)
{
counter = 0;
}
}
The code above relies on getting the current time from the DS3231 RTC,
separated into hour_1, hour_2, minute_1 and minute_2 variables. Then it is just matter of setting the
corresponding segments on/off:
void setDigit(int digit, int value)
{
int i, j;
for (i = DIGIT_IDX_START[digit]; i < (DIGIT_IDX_START[digit] + 28); i++)
{
j = (i - DIGIT_IDX_START[digit]) / 4; // j is segment index
if (DIGIT_MATRIX[value][j])
{
switch (state)
{
case RED:
leds[i] = CRGB(255, 0, 0);
break;
case GREEN:
leds[i] = CRGB(0, 255, 0);
break;
case BLUE:
leds[i] = CRGB(0, 0, 255);
break;
case WHITE:
leds[i] = CRGB(255, 255, 255);
break;
case RAINBOW:
leds[i] = CRGB((i % 4 + 1) * 64, (i % 4 + 2) * 64, (i % 4 + 3)* 64);
break;
case BLACK:
leds[i] = CRGB(0, 0, 0);
break;
default:
leds[i] = CRGB(255, 0, 0);
}
}
else
{
leds[i] = CRGB(0, 0, 0);
}
}
FastLED.setBrightness(brightness);
FastLED.show();
}
The FastLED library works by declaring an array of LEDS in the program. Here
is my array of LEDs:
#define LED_PIN 2
#define NUM_LEDS 4*28
CRGB leds[NUM_LEDS + 2];
int DIGIT_IDX_START[] = {0, 28, 56, 84};
int DIGIT_MATRIX[][7] = {
// A B C D E F G
{HIGH, HIGH, HIGH, HIGH, HIGH, HIGH, LOW}, // 0
{LOW, HIGH, HIGH, LOW, LOW, LOW, LOW}, // 1
{HIGH, HIGH, LOW, HIGH, HIGH, LOW, HIGH}, // 2
{HIGH, HIGH, HIGH, HIGH, LOW, LOW, HIGH}, // 3
{LOW, HIGH, HIGH, LOW, LOW, HIGH, HIGH}, // 4
{HIGH, LOW, HIGH, HIGH, LOW, HIGH, HIGH}, // 5
{HIGH, LOW, HIGH, HIGH, HIGH, HIGH, HIGH}, // 6
{HIGH, HIGH, HIGH, LOW, LOW, LOW, LOW}, // 7
{HIGH, HIGH, HIGH, HIGH, HIGH, HIGH, HIGH}, // 8
{HIGH, HIGH, HIGH, HIGH, LOW, HIGH, HIGH}, // 9
{LOW, LOW, LOW, LOW, LOW, LOW, HIGH}, // '-' index is 10
{LOW, LOW, LOW, LOW, LOW, LOW, LOW} // BLANK index is 11
};
I have an array of 4*28 + 2 LEDS for 4 digits and two dots. The
DIGIT_IDX_START array holds the starting indices of all four digits in that array of LEDS.
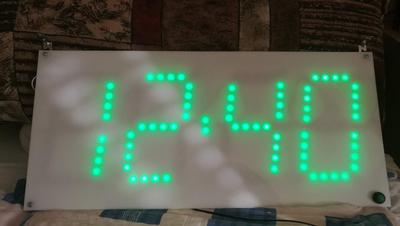
The final look is below. I have placed a white plastic board over LEDs to
disperse the light and now it is quite nice to watch in all lighting conditions:
The button at the lower right corner turns on/off the display.


