Text mode in the FPGA computer
How text mode works
This is a
follow-up of the FPGA computer post.
In this post I will give more details about the text mode of the FPGA computer. The text mode is the default mode for the computer. When the computers powers up, this is the default mode.
In this post I will give more details about the text mode of the FPGA computer. The text mode is the default mode for the computer. When the computers powers up, this is the default mode.
Text mode is 80x60 characters, occupying 4800 words, or 9600 bytes, starting from the address of
2400.
Lower byte is the ASCII code of a character, while the upper byte contains the attributes:
|
7
|
6
|
5
|
4
|
3
|
2
|
1
|
0
|
|
|
Foreground color,
inverted
|
|
Background color
|
||||
|
|
|
r
|
g
|
b
|
r
|
g
|
b
|
The foreground color is inverted so zero values (default) would mean white color. That way, you don't
need to set the foreground color to white, and by default (0, 0, 0), it is white. The default background
color is black (0, 0, 0). This means that if the upper (Attribute) byte is zero (0x00), the background
color is black, and the foreground color is white.
I have used Ken Shirriff's blog post FizzBuzz a lot for this implementation. I highly recommend his
posts!
Verilog implementation relies on the character ROM. Character ROM is implemented as a separate Verilog module, and is used like this:
Verilog implementation relies on the character ROM. Character ROM is implemented as a separate Verilog module, and is used like this:
// Character generator
chars chars_1(
.char(curr_char[7:0]),
.rownum(y[2:0]),
.pixels(pixels)
);
Current character (which is read from the address
of 2400, up to the 2400+9600) is received in the curr_char register.
This register is wired to the chars module, together with two additional parameters:
rownum (wired to the y register - the y coordinate) and the
pixels output register (this register will hold the pixels of the current
character, for the current y coordinate).
The chars module itself
is a giant switch statement:
always
@(*)
case ({char, rownum})
11'b00110000000: pixels = 8'b01111100; //
XXXXX
11'b00110000001: pixels = 8'b11000110; // XX
XX
11'b00110000010: pixels = 8'b11001110; // XX
XXX
11'b00110000011: pixels = 8'b11011110; // XX
XXXX
11'b00110000100: pixels = 8'b11110110; // XXXX
XX
11'b00110000101: pixels = 8'b11100110; // XXX
XX
11'b00110000110: pixels = 8'b01111100; //
XXXXX
11'b00110000111: pixels = 8'b00000000; //
11'b00110001000: pixels = 8'b00110000; // XX
11'b00110001001: pixels = 8'b01110000; // XXX
11'b00110001010: pixels = 8'b00110000; // XX
11'b00110001011: pixels = 8'b00110000; // XX
11'b00110001100: pixels = 8'b00110000; // XX
11'b00110001101: pixels = 8'b00110000; // XX
11'b00110001110: pixels = 8'b11111100; //
XXXXXX
11'b00110001111:
pixels = 8'b00000000; //
As you can see, the input character and the y coordinate
are concatenated to determine which row of pixels will be returned to the vga text
module.
How is the
current_char obtained? There are three distinctive situations
when this byte is obtained:
1. during the visible scanline processing. During this
case, we wait for the last column (pixel) of the current character to be displayed, and
then we fetch the next character:
else if (x < 640 && !mem_read) begin
if ((x & 7) == 7) begin
// when we are finishing current character,
// we need to fetch in advance
// the next character (x+1, y)
// (at the last pixel of the current character, let's fetch next)
rd <= 1'b1;
wr <= 1'b0;
addr <= VIDEO_MEM_ADDR + ((x >> 3) + (y >> 3)*80 + 1);
mem_read <= 1'b1;
end
end
2. during the horizontal blanking. During this case, we need to obtain either the current character (we haven't finished the current row yet), or the next character in the next row:
else if ((x >= 640)
&& ((y & 7) < 7)) begin
// when we start the horizontal
blanking,
// and still displaying character in the current
row,
// we need to fetch in
advance
// the first character in the current row (0,
row)
rd <= 1'b1;
wr <= 1'b0;
addr <= VIDEO_MEM_ADDR + ((y >>
3)*80);
mem_read <= 1'b1;
end
else if ((x >= 640)
&& ((y & 7) == 7)) begin
// when we start the horizontal
blanking,
// and we need to go to the next
line,
// we need to fetch in advance the first
character in next row (0, row+1)
rd <= 1'b1;
wr <= 1'b0;
addr <= VIDEO_MEM_ADDR + (((y >>
3) + 1)*80);
mem_read <= 1'b1;
end
3. during the vertical blanking. In this case, we need to fetch the
first character, at the beginning of the frame buffer:
if ((x >= 640) &&
(y >= 480)) begin
// when we start the vertical
blanking,
// we need to fetch in advance the first character (0,
0)
rd <= 1'b1;
wr <= 1'b0;
addr <= VIDEO_MEM_ADDR + 0;
mem_read <= 1'b1;
end
The code above sets the address bus and control lines. The
character is then fetched from the data bus:
if (mem_read)
begin
curr_char <=
data;
rd <= 1'bz;
wr <= 1'bz;
mem_read <=
1'b0;
end
The character is wired to
the character ROM, and the output is placed in the pixels
register. From that point, the pixels are shifted bit by bit to the r, g, and b
wires of VGA connector:
if (valid)
begin
r <= pixels[7 - (x & 7)] ?
!curr_char[6+8] : curr_char[2+8];
g <= pixels[7 - (x & 7)] ?
!curr_char[5+8] : curr_char[1+8];
b <= pixels[7 - (x & 7)] ?
!curr_char[4+8] : curr_char[0+8];
end
else begin
// blanking -> no pixels
r <= 1'b0;
g <= 1'b0;
b <= 1'b0;
end
It is interesting how horizontal and vertical sync pulses
are generated:
assign hs = x <
(640 + 16) || x >= (640 + 16 + 96);
assign vs = y <
(480 + 10) || y >= (480 + 10 + 2);
assign valid = (x
< 640) && (y < 480);
Just by wiring
hs an vs one-bit registers
to the VGA connector and by assigning to them expressions above, horizontal
and vertical sync pulses are generated according to the current state of the
x and y counters. When the
x counter reaches 640 + 10, it is the end of the
current scanline and the hs pulse is low (inverted
logic). Similarly, the vs pulse is low when the
y counter (the line counter) reaches 480 +
10.
If you look at
the value range of the x and y
registers, you will see that the x
goes from 0 to 799, while y goes from
0 to 524. This means that the actual resolution of the VGA 640x480 mode
is 800x525. However, during the horizontal and vertical blanking some of
those pixels (and also lines) are not visible, so the actual visible
pixels are from the 640x480 range. That is detected in the
"assign valid =..." line of the code
above.
Programming in assembler
Assembler
examples can be found here.
Following assembler code writes a string with color attributes.
Following assembler code writes a string with color attributes.
mov r1, hello ; r1 holds
the address of the "Hello World!" string
mov r2, 0 ; r2 is the
index
mov r3, 0 ; r3 has
the attribute
again:
ld.b r0, [r1] ; load r0
with the content of the memory location to which r1 points
(current character)
cmp r0, 0 ; if the
current character is 0 (string terminator),
jz end ; go out of
this loop
st.b [r2 + VIDEO_1], r3;
store the attribute
inc r2 ; move to the
character location
st.b [r2 + VIDEO_1], r0;
store the character at the VIDEO_0 + r2
inc r1 ; move to the next
character in the string
inc r2 ; move to
the next location (attribute) in video
memory
inc r3 ; change
the attribute of the current character
j again ; continue
with the loop
end:
halt
hello:
#str "Hello
World!\0"
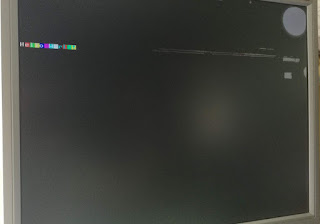
The result is on the image below.
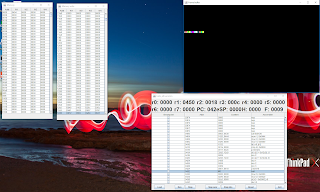
In the emulator, it looks like this:
Conclusion
The text mode is
implemented by reading the character from the framebuffer, and then by
obtaining its pixels from the character ROM. When those pixels are obtained,
they are shifted one by one to the VGA connector, to the corresponding r, g
and b wires. That way, the character is shown on the screen. I have
implemented the text mode first, and then l have implemented the graphics
mode. Both modes are surprisingly simple to be implemented in
Verilog.
Text mode module is on the github.


Comments
Comments powered by Disqus