Raspberry PI stuff
Various stuff about Raspberry Pi
I will try to put my experience in this post. I will start with the installation, and then go with other
stuff. Here are shortcuts:
1. Installation
2. RPI3 with static IP Ethernet support
3. RPI Zero with static IP Wifi support,
4. Adding RPI Zero support for the Ethernet,
5. Static IP on both Ethernet and Wifi,
6. Installing Java,
7. Installing and configuring Samba,
8. Read-only file system,
9. Hardware watchdog for Raspberry Pi Zero.
Installation
You need to download the OS image from the official Raspberry PI site:
I prefer Raspbian with desktop.
Then you need to download the Etcher software for writing the OS image to the micro SD card:
Put the micro SD card in your computer, start the Etcher, choose the image file and write.
When everything is done, remove the micro SD card safely from the PC, put it in the Raspberry
PI, connect HDMI cable (in case of Zero, mini HDMI cable) from RPI to the monitor (or TV), and connect the
keyboard to one of the USB ports (in case of RPI Zero, you need to connect your USB keyboard via adapter to
the micro USB port). Connect the power cable. RPI will boot for the first time.
I prefer to set up the static IP to my RPIs, so here are some combinations:
Default username/password is pi/raspberry.
Upon login, start the raspi-config by typing:
sudo raspi-config
This will start the configuration utility for the RPI. I use it to set up the new password, host name
of the RPI and to turn on almost all interfacing options. When setting the interfacing options, I turn
on the SSH, I2C, SPI and 1-wire.
When exiting, the raspi-config will reboot the machine.
I prefer to set up the static IP to my RPIs, so here are some combinations:
1. Set up RPI 3 with the static IP on Ethernet,
2. Setup RPI Zero with the static IP on wireless,
3. Set up RPI Zero with the Ethernet support (needs additional ENC28J60 module to be connected to the RPI Zero).
3. Set up RPI Zero with the Ethernet support (needs additional ENC28J60 module to be connected to the RPI Zero).
Setting up RPI 3 with the static IP on Ethernet (and WiFi)
Before booting, connect the Ethernet cable from your router to the RPI 3, and connect the power. You can
then log on. From that moment, you can set up the static IP address. Before that, you can check if the
networking works. First of all, you can type:
ifconfig
This will write your IP address, which your RPI obtained from the router
(via DHCP). If the IP address of the RPI begins, for example, with
192.168.1, then the static IP address will need to start the same way (remember first three numbers
of the IP address).
Here we have two branches:
1. from stretch, on with the buster
builds of the Raspbian
2. before stretch build.
Stretch, buster, and newer builds
To set up the static IP address, you need to edit the
/etc/network/interfaces file:
sudo nano /etc/network/interfaces
The nano editor will open the interfaces file. You can then put the following content:
# interfaces(5) file used by ifup(8) and ifdown(8)
# Please note that this file is written to be used with dhcpcd
# For static IP, consult /etc/dhcpcd.conf and 'man dhcpcd.conf'
# Include files from /etc/network/interfaces.d:
source-directory /etc/network/interfaces.d
auto lo
iface lo inet loopback
auto eth0
allow-hotplug eth0
iface eth0 inet manual
auto wlan0
allow-hotplug wlan0
iface wlan0 inet manual
wpa-conf /etc/wpa_supplicant/wpa_supplicant.conf
Both eth0 and wlan0 (I have decided to assign my wlan0 static address, too) are set to manual. In case of wlan0, you need to edit the /etc/wpa_supplicant/wpa_supplicant.conf file to the basic content:
ctrl_interface=DIR=/var/run/wpa_supplicant GROUP=netdev
update_config=1
network={
ssid="xxxx"
psk="yyyy"
}
Then you need to add the following code to the end of the /etc/dhcpcd.conf
file:
# Static eth0 IP configuration
interface eth0
static ip_address=192.168.1.207/24
static routers=192.168.1.1
static domain_name_servers=192.168.1.1 8.8.8.8
# Static wlan0 IP configuration
interface wlan0
static ip_address=192.168.1.217/24
static routers=192.168.1.1
static domain_name_servers=192.168.1.1 8.8.8.8
iface lo inet loopback
auto eth0
allow-hotplug eth0
iface eth0 inet manual
auto wlan0
allow-hotplug wlan0
iface wlan0 inet manual
wpa-conf /etc/wpa_supplicant/wpa_supplicant.conf
Both eth0 and wlan0 (I have decided to assign my wlan0 static address, too) are set to manual. In case of wlan0, you need to edit the /etc/wpa_supplicant/wpa_supplicant.conf file to the basic content:
ctrl_interface=DIR=/var/run/wpa_supplicant GROUP=netdev
update_config=1
network={
ssid="xxxx"
psk="yyyy"
}
# Static eth0 IP configuration
interface eth0
static ip_address=192.168.1.207/24
static routers=192.168.1.1
static domain_name_servers=192.168.1.1 8.8.8.8
# Static wlan0 IP configuration
interface wlan0
static ip_address=192.168.1.217/24
static routers=192.168.1.1
static domain_name_servers=192.168.1.1 8.8.8.8
Before stretch (or buster) builds
To set up the static IP address, you
need to edit the /etc/network/interfaces file:
sudo nano /etc/network/interfaces
The nano editor will open the interfaces file. You can then put the following content:
# interfaces(5) file used by ifup(8) and ifdown(8)
# Please note that this file is written to be used with dhcpcd
# For static IP, consult /etc/dhcpcd.conf and 'man dhcpcd.conf'
# Include files from /etc/network/interfaces.d:
source-directory /etc/network/interfaces.d
auto lo
iface lo inet loopback
allow-hotplug eth0
iface eth0 inet static
address 192.168.1.200
netmask 255.255.255.0
gateway 192.168.1.1
The address set in this example is 192.168.1.200. After that, you can restart the networking by
typing:
sudo service networking restart
Or, you can reboot the RPI by typing:
sudo reboot
sudo service networking restart
Or, you can reboot the RPI by typing:
sudo reboot
Setting up RPI Zero with the static IP on Wireless
RPI Zero W already has the wireless, while RPI Zero does not. In case of having the RPI Zero, you need to
obtain WiFi dongle and some adapter to connect it to the micro USB port. After that, the procedure is the
same for both RPI Zero W and RPI Zero.
Here too, we have two branches:
1. stretch/buster builds.
2. pre-stretch(or buster) builds
You need to edit the /etc/network/interfaces by typing:
Here too, we have two branches:
1. stretch/buster builds.
2. pre-stretch(or buster) builds
Stretch, buster, and newer builds
Just look above at the same title.
Before stretch (or buster) builds
sudo nano /etc/network/interfaces
In the nano editor, change the interfaces file to:
# interfaces(5) file used by ifup(8) and ifdown(8)
# Please note that this file is written to be used with dhcpcd
# For static IP, consult /etc/dhcpcd.conf and 'man dhcpcd.conf'
# Include files from /etc/network/interfaces.d:
source-directory /etc/network/interfaces.d
auto lo
iface lo inet loopback
allow-hotplug wlan0
iface wlan0 inet static
# wpa-conf /etc/wpa_supplicant/wpa_supplicant.conf
wpa-ssid "MySSID"
wpa-psk "xxxxxx"
address 192.168.1.201
netmask 255.255.255.0
gateway 192.168.1.1
The address set in this example is 192.168.1.201. The MySSID is the SSID of your WiFi network. You must
enter the SSID and the password with the quotes (").
Setting up RPI Zero for the Ethernet support
RPI Zero supports the ENC28J60 Ethernet module out of box.
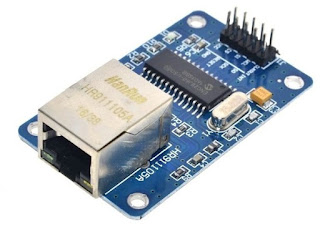
This module needs to be connected to the RPI Zero via SPI interface. Don't forget to enable the SPI from the raspi-config tool (look above). After that, you need to do the following:

ENC28J60 Ethernet module
This module needs to be connected to the RPI Zero via SPI interface. Don't forget to enable the SPI from the raspi-config tool (look above). After that, you need to do the following:
1. Connect the ENC28J60 module to the RPI using the following pin scheme:
Pi PinNo
ENC28J60
---------------------------------
+3V3 17
VCC
GPIO10/MOSI 19
SI
GPIO9/MISO 21
SO
GPIO11/SCLK 23
SCK
GND 20
GND
GPIO25 22
INT
CE0#/GPIO8 24
CS
2. Enable the ENC28j60 module at the end of your /boot/config.txt file by typing:
sudo nano /boot/config.txt
This will open the nano editor. Go to the end of the file and enter the following text:
dtoverlay=enc28j60
3. Reboot (sudo reboot)
From this moment on, you can work with the Ethernet as eth0 device.
Having static IP on both Ethernet and WiFi
The text below is for the pre-stretch/buster builds. For having both ethernet and WiFi static, look above,
at the "Setting up RPI 3 with the static IP on Ethernet (and WiFi)" title.
If you want to have the static IP on both Ethernet port and WiFi, you need to edit the /etc/network/interfaces file and put the following text:
If you want to have the static IP on both Ethernet port and WiFi, you need to edit the /etc/network/interfaces file and put the following text:
# interfaces(5) file used by ifup(8) and ifdown(8)
# Please note that this file is written to be used with dhcpcd
# For static IP, consult /etc/dhcpcd.conf and 'man dhcpcd.conf'
# Include files from /etc/network/interfaces.d:
source-directory /etc/network/interfaces.d
auto lo
iface lo inet loopback
#allow-hotplug eth0
iface eth0 inet static
address 192.168.1.202
netmask 255.255.255.0
gateway 192.168.1.1
auto wlan0
#allow-hotplug wlan0
iface wlan0 inet static
# wpa-conf /etc/wpa_supplicant/wpa_supplicant.conf
wpa-ssid "MySSID"
wpa-psk "xxxxxxx"
address 192.168.1.212
netmask 255.255.255.0
gateway 192.168.1.1
The address set in this example for the Ethernet is 192.168.1.202 and for the WiFi is 192.168.1.212.
Installing Java8 on your RPI
Type the following in your console:
sudo aptitude install oracle-java8-jdk
This will install the Java8 installer and would run it.
Samba support
Samba allows you to share a part of your RPI disk to the network, for other machines and users. It also
allows you to access other samba shares on the network. We will focus on the sharing of our disk on the
network.
Install Samba via apt-get:
sudo apt-get install samba samba-common-bin
Edit the smb.conf file using nano:
sudo nano /etc/samba/smb.conf
Find the entries for workgroup and wins support, and set them up as follows:
workgroup = your_workgroup_name
wins support = yes
You also need to add the following section to end of the smb.conf to add share:
[pihome]
comment= Pi Home
path=/home/pi
browseable=Yes
writeable=Yes
only guest=no
create mask=0777
directory mask=0777
public=no
This will add the Samba share named "pihome" on your RPI, so it will be accessible from other machines.
At the end, we need to add the current user to the Samba:
sudo smbpasswd -a pi
After that, just restart the smbd daemon:
sudo systemctl restart smbd
Comments
Comments powered by Disqus